In this post, we will guide you how to run a forward test on the tick feed from your MT4 client terminal. We have separate instructions on how to forward test on TrueFX WebAPI, how to back test on historical prices and how to copy trades from the TrueFX live feed (WebAPI) to your MT4 client terminal.
We assume you have the Day Trading Tester Suite installed. If you don’t yet have the software, you can get it here.
To use live prices from your MT4 client terminal in the Suite, you need to download the MT connector – a special proxy EA that you need to deploy to the Metatrader client terminal, which must run on the same Windows computer where the Suite is running.
We assume that by now you have the EA .ex4 file ready to be deployed.
After you started the Suite software, you need to perform 4 steps.
Step 1. Select the live data source
To use live prices from your MT4 client terminal, on the Toolbar, click the MT button. You will be readdressed to the Real time tab.
Step 2. Deploy the MT connector
Drag the MT connector to the chart in the Metatrader terminal like any other EA. Make sure to check the boxes Allow DLL imports and Allow live trading.
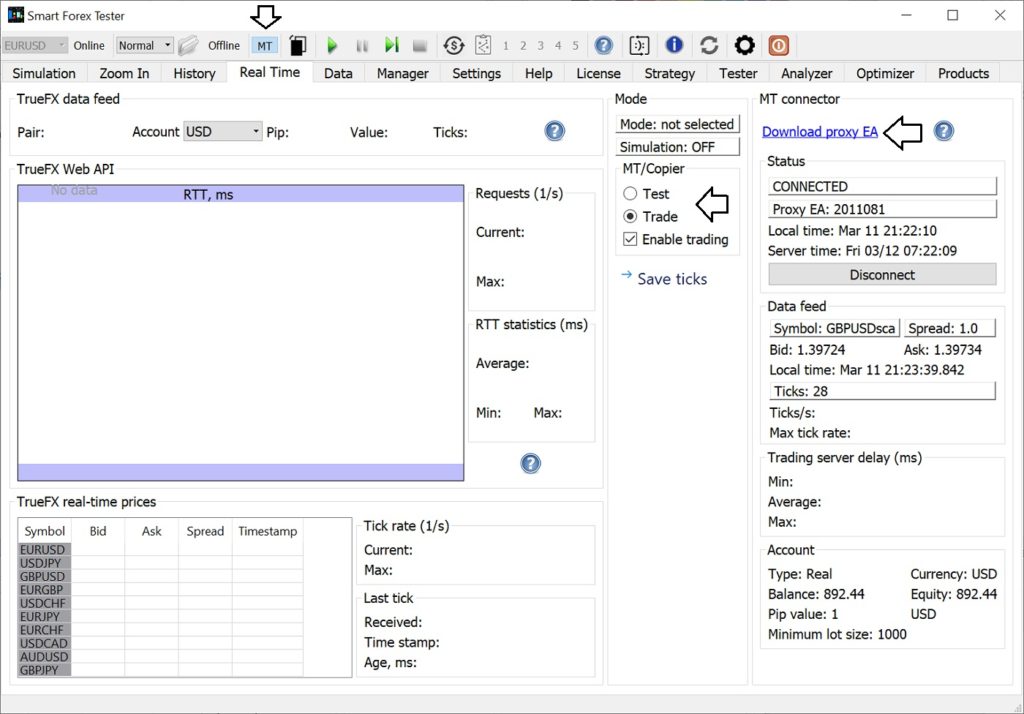
As shown on the screenshot above, the MT connector status will change to CONNECTED and ticks will start coming.
NOTE: if the connection fails, restart the Suite and repeat.
Now, select the MT connector mode: Test or Trade. The difference between modes is in how the trades are executed.
In the Test mode, the trades are executed locally in the Simulator. This way you can test your broker’s live feed without any risk, save ticks and then proceed with back testing.
Whereas in the Trade mode the strategy sends all orders to the MT connector which in turn places the trades in the Metatrader. This way you can do real trading.
NOTE: at this point no trades will happen yet – regardless of the mode.
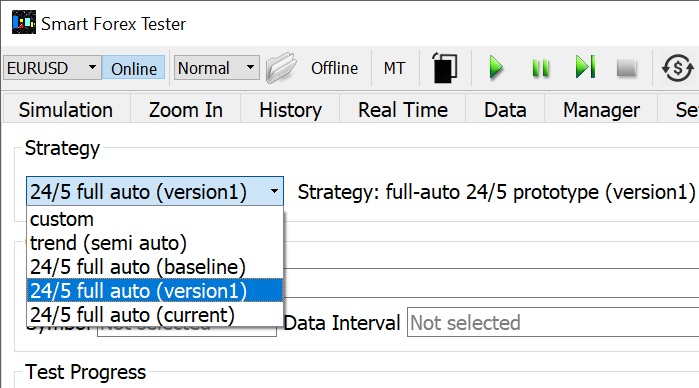
Step 3. Define the automated trading strategy
Go to the Tester tab and from the Strategy drop-down list, select one of pre-defined strategies that you want to run the test with. We suggest selecting version1 which is the latest as of this writing. See the Advanced section below on how to test your own strategy.
Now, set the desired strategy parameters. For that, open the Automated Trader GUI by clicking the $ button on the Toolbar.
You can configure StopLoss (SL), TakeProfit (TP) and MaxSpread. After you change a value in the control, it stays highlighted until you click the corresponding Set button to make the change saved in the software.
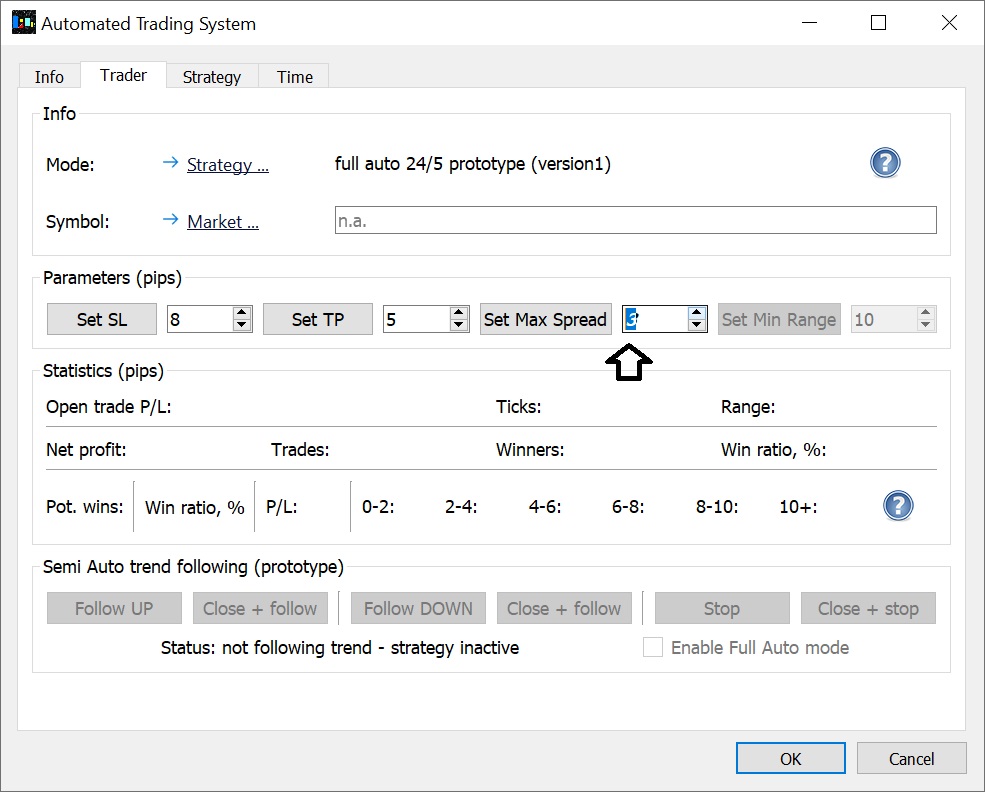
Note that you can change the values during runtime as well. The changes are instant – except if you have an active trade. Then the new values will be in effect from the next trade.
While SL is static, TP is not in the version1 strategy. Once current profit exceeds the set value, the strategy moves the SL level to the breakeven and starts trailing – but slower than the profit grows.
The MaxSpread parameter forbids entering the markets if the current spread exceeds the set value.
You may want to use the parameters from our continuous GBPUSD forward test – after all, it has won over 5,000 pips since October 2020. We used TP=5, SL=8, MaxSpread=2 pips.
Step 4. Define the Pivot Point Analyzer (PPA) parameters
If you are new to the PPA, we suggest starting with the same values we used in the continuous test mentioned above.
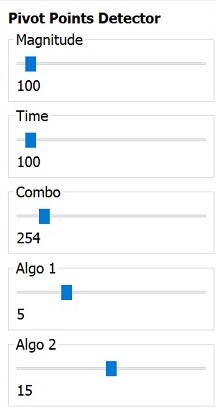
To set the parameters, go to the Analyzer tab, and set the values by moving the sliders with the mouse then fine tuning with the arrow keys.
Now, you are all set! Just click the green Play button on the Toolbar to start the simulation.
Restarting the test
If you want to run a test for some other currency pair, you need to stop the current simulation first. Use the green Stop button on the Toolbar.
Then you need to disconnect the MT connector. Click on the Disconnect button and wait for the next tick – then the connector EA will be removed from the Metatrader chart automatically.
In case you don’t want to wait for the next tick to come, you can remove the EA from the graph manually.
Then you can repeat the same steps for another currency pair. We strongly recommend restating the Suite before that.
Saving live feed ticks
At any time, even with a test running, you can save the ticks from the beginning of the test up to the current moment. Click the Save ticks… button on the Real time tab and specify the file name. Ticks are saved as a .csv file, you can edit it with any text editor.
Saving the trade log
Your trades will be shown in the table on the History tab. At any time, you can save the snapshot in the file. Click the Save trades… button on the Tester tab and specify the file name. Trades are saved as a .csv file, you can edit it with any text editor.
NOTE: you may need to adjust the time format in Excel to view the time stamps of the trades with maximum accuracy.
Advanced
If you want to test your own strategy, you need to select custom in the Step 2. This assumes your strategy is ready. Read the step-by-step instructions how to prepare your strategy.